Translate

Saturday, 24 September 2016

Floored it!

So let's take a stroll down memory lane and reminisce about the original state we found the extension area to the farmhouse. It had vines growing from the ceiling, which I can tell you were a real pain to remove because they had latched onto the vinyl board and weren't too keen on being detached!  


There was old tatami that had seen better days and then carpet laid over that so that any guests visiting could sleep-over. 


So when the day finally arrived to rip up that old carpet and tatami we were so pleased when we reached the base board. Carpet in itself is heavy to pull up, but can you imagine how heavy old tatami is? Well, it's like a dead weight!! We have an idea to recycle it out in the garden like mulch which will also build up the garden bed. Any chance to recycle and up-cycle anything at the farmhouse is really satisfying. It really gets the creative juices following. 
The next stage was to improve this area with cedar floorboards. Prior to laying the boards we put down some plastic sheeting to reduce moisture from getting in. But why cedar you ask, well we chose it for a few reasons. It was quite easy to work with, breaths well and  when it is hot or cold outside we are comfortable indoors!


Not looking too bad if I don't say so myself!


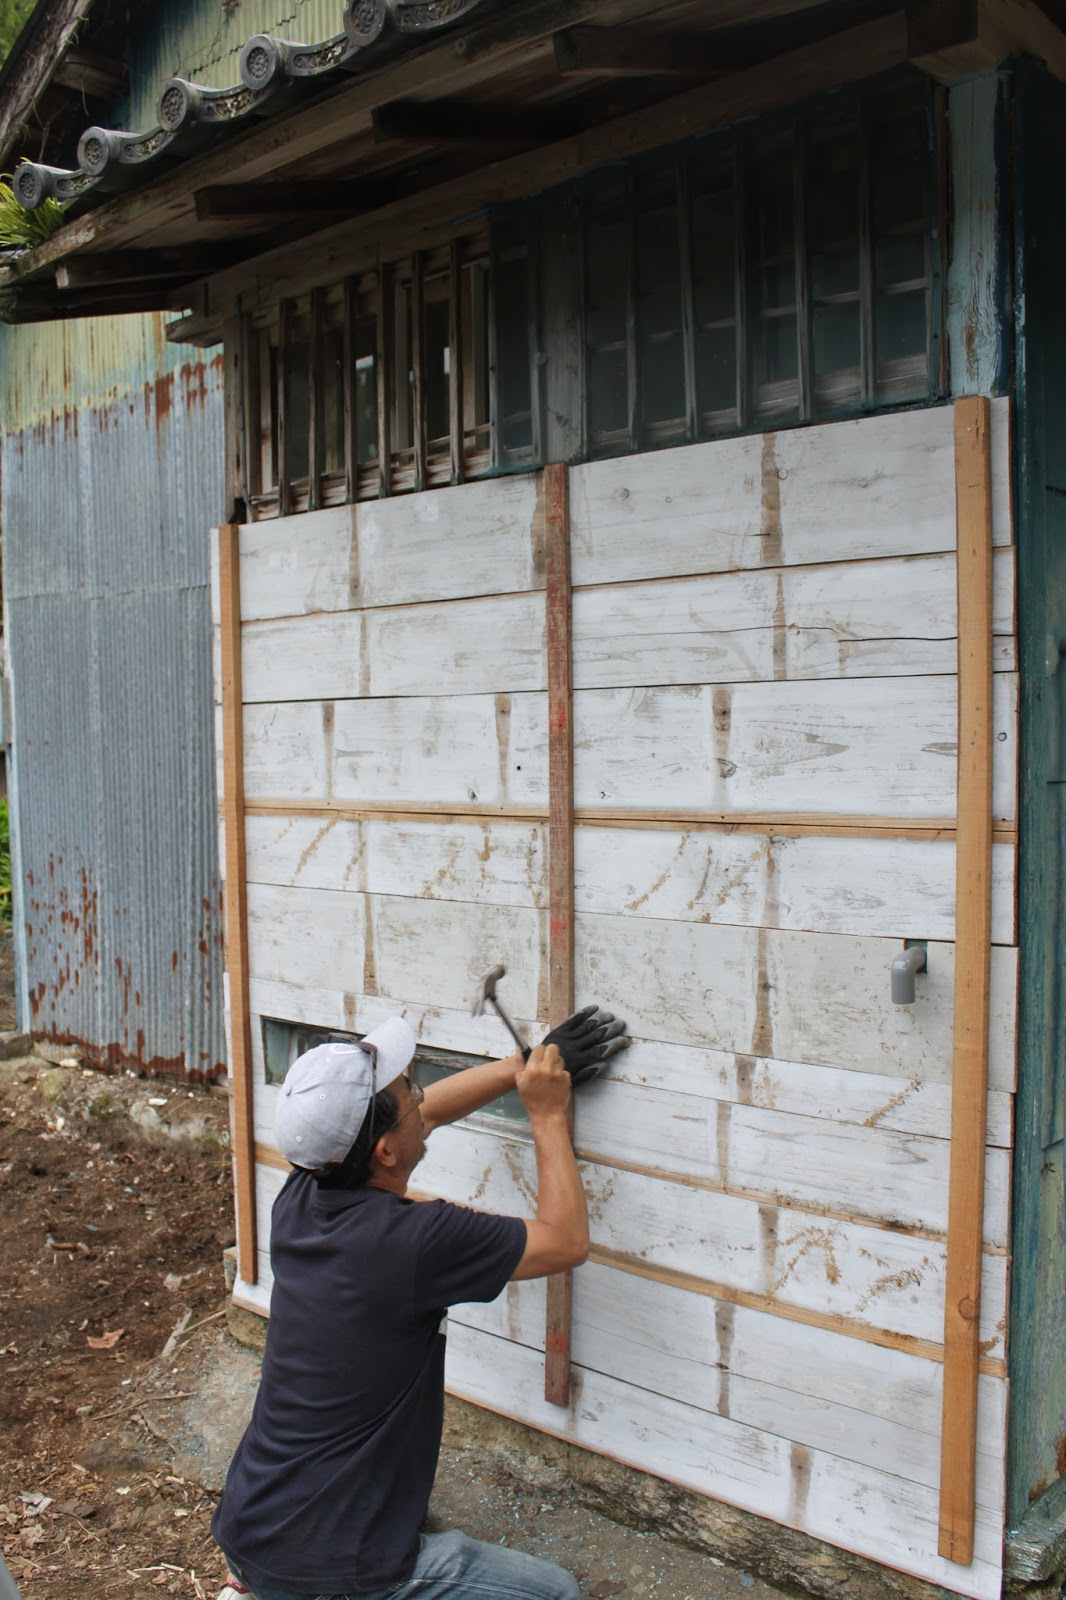
Then we moved onto the walls of the kitchen by lining it with a plastic sheeting as well.


At this point its becoming quite exciting with the kitchen walls going up. We can finally see it all coming together after such a long process to get here. Remember we firstly had to level out the house with a car jack, as the poor old farmhouse had sunk to one side. The constant flow of water down the side of the house going in all directions had caused the land to weaken. I'll be sharing what we have done to remedy this problem in a future post. 


Measure, cut, hammer, repeat!


Can you see what appears to be window openings with no windows in place? Well, after some brainstorming we came up with the idea to recycle some glass doors from a cupboard to allow for more light and air flow. It's all still coming together, but when we install them I'll  share the results with you. 


And here we are with both floor and walls completed!


There were a number of knots in the timber, so we just puttied them up. 


We chose an "oak" coloured varnish for the floors which came up quite well with the country farmhouse look we are aiming for at Obachan chi's.  


And a matte black for the walls going only half way up the length of the wall.


Sitting on the floor I had this beautiful view from the windows above me of a tree covered wilderness, making this painting job quite pleasurable.


I really like how you can still see the knots of the timber through the paint.


Working together is the best because we definitely get things done faster and my dear husband is always good company!


Loving this combination!


So now this area awaits our kitchen which I will tell you is simple in its design. This was intentionally done. Can't wait to share it with you! 

Sunday, 11 September 2016

Door spa...wash, sand & varnish

On a beautiful sunny day here at the farmhouse I decided to tackle a pair of storm shutter doors in an area behind the house that we refer to as the courtyard. The doors were needing some love in the form of a wipe down, a light sanding and then a coat of varnish. In this case I opted for a clear varnish to try and reveal the natural wood grain. 


On the left we have the door awaiting a varnish and to the right the door with one coat of natural varnish, which in my opinion looked a bit flat. 


I'm happy that I tried out the natural varnish, however I think they need another coat of varnish. So I just used what we had, which was what I used on the genkan.


The storm shutters do a pretty good job protecting the shoji screens, but unfortunately there are gaps that can't be helped, so from time to time we do have unwanted creepy crawlies that we have to shoo out the door! It's peace of mind though, that the doors have a coat of varnish to protect them a little more than before, but here they are with a tinted coat just drying.
Ahh.... much better!


Sunday, 4 September 2016

From Trash to Treasure

In my local area here in Yokohama we noticed that an old possibly pre-war house was being demolished. I had been admiring it for a while and could see such potential, but sadly its day was numbered. Roof tiles were being pulled off and the demo men were in full swing. What is the old expression, "One man's trash, is another man's treasure." The demo men were happy to pass off roof tiles, shoji screens, an old exterior lamp light and this little beauty, a tetsutoro, a wrought iron lantern! But it didn't look like this when we got it.


I knew under all that rust was a little treasure, like a little jewel that just needed some elbow grease and a coat of paint. 


My enthusiastic assistant was on hand to help give the little lantern a good old scrub, wearing her swimming goggles!


Then a spray of rust repellent paint and after drying a spray of black....


And voila!

Our little tetsutoro restored and hanging proudly once again, but now at Obachan chi's! 


Unfortunately, the plate underneath which would have held a small candle is missing. So we are thinking about how to replace it. Any ideas?

Saturday, 27 August 2016

Some street appeal

The weather has been warm in Izu but that hasn't stop me from giving the little old farmhouse some street appeal. As you can see the side of the house with its rusted corrugated iron was needing some attention, so that is what we did. 


With some corrugated iron cutting scissors I painstakingly tried to cut a straight line to remove the rusted parts. I may have even asked for some help with this task, those scissors are tough to use! 


One side revealed some badly damaged mud wall, but we repaired that with some spare sheets we found lying around.   


Once we replaced the rusted parts I gave these areas a spray with rust repellent.


Using a wire brush I scrubbed and then gave the side area a spray as well.


This is the side of our toilet. We just laid recycled timber boards across the metal tin underneath and....


....gave it a paint!


We are fortunate that we have good neighbours with one in particular who is also doing some renovations, so we help each other out with resources. In our case, we were able to use their scaffolding. While it doesn't look that high up, remember I have no bracing and nothing really to hold onto around me should I fall, so let's just say my legs were a little like jelly. But I got the job done! Don't you just love the colour!


Here is the side of the house...BEFORE


And........ AFTER!!

You can see I have only painted part way up to the peak. The reason being that from the rusted line and up we are planning to attach a white board, which is in-line with the traditional black and white look we are going for at Obachan chi's. I thought about replacing that side blue tin door with a timber one, but for the moment I just ended up painting it. 
We cannot wait to share the final results with you, but this is our progress so far. We have a way to go, but it's a good feeling to get a start on outside.The tiled roof is also on our plans to repair. And yes, they are weeds growing on the toilet side roof! Due to the traditional way of using mud under the tiles and then said tiles either cracking or falling off, it had resulted in some unsightly growth. I never thought in my life that I would be painting the exterior of a house black, but we are liking what we see (while it isn't much just yet). It seems to really be a theme in the little farmhouse both in and outside. It's all slowly coming together. So what do think of the colour?

Sunday, 21 August 2016

The other side

                      
I had an idea....to open up and allow more light and and airflow throughout the little farmhouse. Not everyone was onboard with my idea initially, but during some discussions one night the realization that my idea was indeed a brilliant one was soon realized and so the mud wall was finally coming down.

BEFORE- Mud wall behind refrigerator


I forgot to mention that another very worthy reason to remove this wall was due to it's crumbling condition when we pulled the vinyl board off. I know we could have repaired it, but again there was a greater need to bring more light into the area and to also allow for better access from the main living area to the kitchen. 


The end result has really opened up the rooms creating a totally different, but good feeling. It also allows us to walk on one level, instead of sliding the shoji screen open in the main area walking down a step through the genkan and then up again to get to the new kitchen area. I know it's hard to visualize what I am talking about at the moment, but when we share the new kitchen with you and the progress there you may me able to understand what I am talking about. At this point we are happy with the end result. Surprisingly I thought we'd need a sledge hammer to knock the mud wall out, but all that was needed was a hand saw and then a good old shove! It's amazing just how strong mud walls are, with a bamboo frame securing them together.

And you guessed it...feeling dirty and dusty we are off to the onsen!

Sunday, 14 August 2016

Spinning history


One Saturday morning we found ourselves at a nearby antique market. One thing I noticed  as we walked around was that a lot of the store holders were selling these wooden stands. I'd never really noticed them before, but they are actually spools that are used to wrap silk and/or cotton thread around the outside of the legs. Like a large bobbin in your sewing machine. Little did I know that my interest for these spools would be connected with the Osawa Onsen Hotel that I shared with you in my previous post here


The town of Matsuzaki was one of three major silk worm producing areas in Japan. The other two areas in Japan being Gunma and Nagano. 


Of course my spools were not going to be used for their original purpose. I don't see myself weaving a kimono anytime soon! I gave my frames a wipe over since they looked like that had been kept in some dirty, dusty old box for a considerable amount of time and a lick of  clear varnish. It was a very therapeutic project sitting outdoors in the open air with the bamboo forest surrounding me.  


Here are two ways I like to use mine....


Firstly as a plant stand and secondly as....


 ...a plate stand.

I love how they turned out and since buying these I have added to the collection with a medium sized frame. They were a fun and budget friendly DIY project. 

   
Have you ever bought something with another use in mind?